How to Engrave Metal: A Step-by-Step Guide to Engraving a Metal Water Bottle
If you're looking to personalize your metal water bottle, engraving is a great option. Engraving allows you to create a custom design that's unique to you. In this tutorial, we'll show you how to engrave a metal water bottle using the Customizer, a portable engraving pen. Follow these steps to learn how to engrave metal like a pro.
Materials needed:
- Metal water bottle
- Engraving tool (like The Customizer)
- Stencil (optional)
- Masking tape
- Rubbing alcohol
- Cotton swab
Step 1: Prepare the Metal Water Bottle

Before you begin engraving, you'll need to prepare the metal water bottle. Clean the surface of the bottle using a cotton swab dipped in rubbing alcohol to remove any dirt, oils, or residue. Make sure the bottle is dry before proceeding to the next step.
Step 2: Create a Design or Stencil
Create a design or stencil that fits the size of your metal water bottle. You can either draw a design freehand or print out a design and cut it out to create a stencil.
Step 3: Attach the Stencil to the Bottle (Optional)
If you're using a stencil, attach it to the bottle using masking tape. Make sure it's positioned correctly and securely.
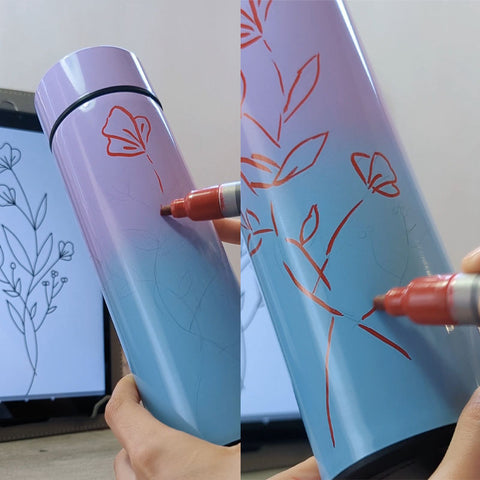
Step 4: Begin Engraving with the Customizer

The Customizer is a portable engraving pen that can be used to etch designs onto metal surfaces. Insert the desired engraving tip and turn on the device. We recommend the ball bits, because they are the best ones for metal. Apply light pressure to the metal surface and move the pen in a smooth and steady motion to engrave the design onto the surface.
Step 5: Clean Up the Engraving

Once you've finished engraving, use a cotton swab dipped in rubbing alcohol to clean up any residue or debris left from the engraving process.
Step 6: Finish and Enjoy

Once the metal water bottle is clean and dry, your engraving is complete! Fill the bottle with your favorite beverage and enjoy your personalized creation.
Tips:
- Practice on a scrap piece of metal first to get a feel for the engraving tool and technique.
- Take breaks as needed to avoid hand fatigue or discomfort.
- If you make a mistake while engraving, don't worry! You can use sandpaper or a buffing tool to remove the mistake and start over.
Engraving metal is a fun and creative way to personalize your metal water bottle. By following these steps and using the Customizer, you'll be able to create a custom design that's unique to you. With a little practice, you'll be engraving like a pro in no time!


4 comments
Neat ideas thank you
I still haven’t opened but will! I bought for someone else but not sure but what I’ll keep it! Keep sending!
Great stuff. More on the type of burrs used for particular engravings please.
Perfeito ☺